Easy on the DIY Pallet
The pallet furniture craze is posted all over the “do it yourself” web. Is it all it’s made out to be? Is it worth it? Our DIY pro, Elle Franco embarks on making outside pallet seating furniture and gives you her honest account of the ups, downs and splinters she encounters. Read on.
You are scrolling through Pinterest and being a DIY enthusiast you search for pallet projects, amazing images pop up that ignite your passion for getting your hands dirty and creating something DIY. You start pinning frantically to your “DIY” board and you think to yourself, how hard can that be? I can do that! I will do that… tomorrow.
This was me, and as I sit on my complete pallet furniture, I almost forgot the times I wanted to give up. It all started with a pin: I pinned it and could not get out of my mind how wonderful it would be to have family and friends over for a braai and sit on “outdoor” furniture that is as functional and looks just as good as the expensive store furniture. It can be done!
Step 1: Finding the right pallets
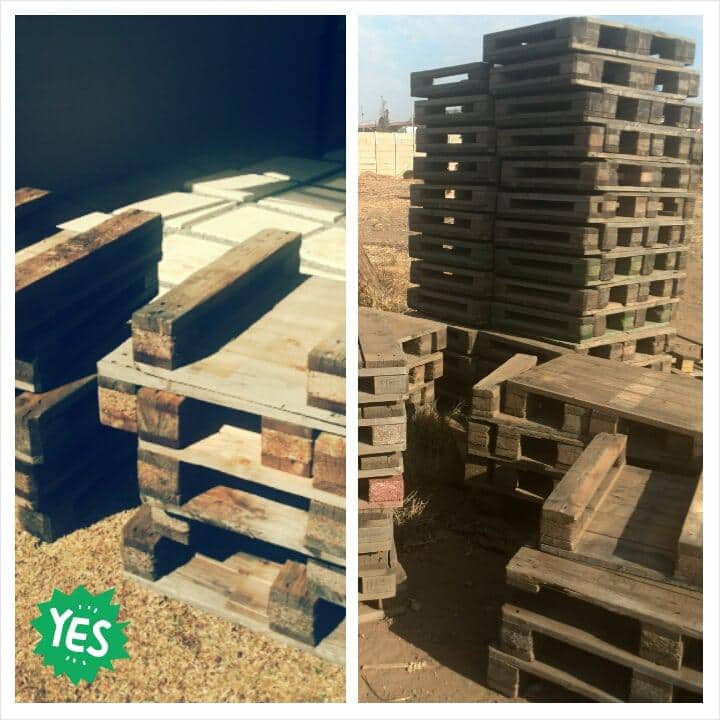
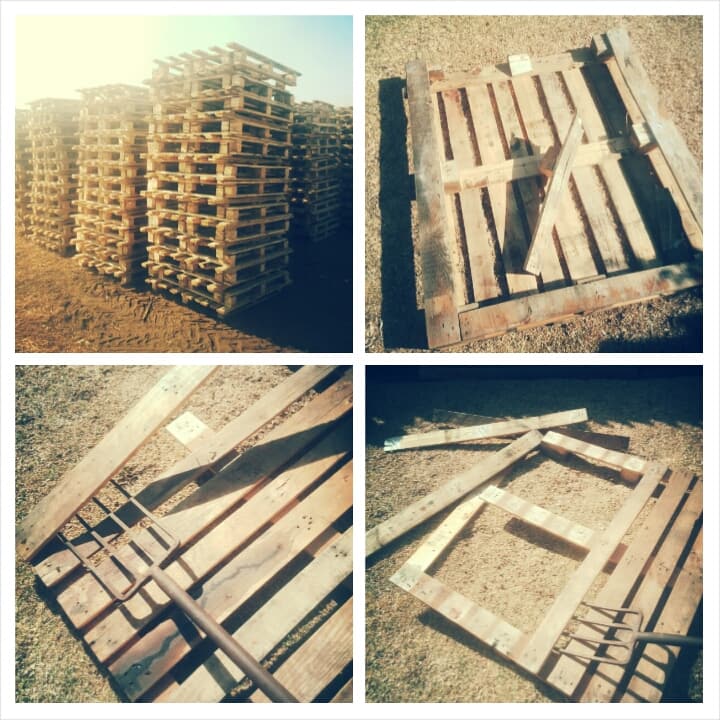
I made the mistake of using huge, old pallets sitting at the back of my father’s factory. I thought I will dismantle them and use the single wood slates. How hard can it be? I have watched endless YouTube videos on “how to dismantle a pallet”. The only thing I dismantled that day was my nerves! It was difficult! There I was with a garden fork for leverage and pushing all my weight to pop up the pallets only to find most of the wood split and the ugly rusted nails clinging to the wood for dear life. Two hours go by and exhausted, I looked up stopped and thought there has to be better pallets out there somewhere. While taking off my safety gloves and gear, as this is dangerous work (safety always comes first) I called a friend who I remembered said she knew of a pallet factory in Germiston. The next day we were there, I was eager to find my perfect pallet.
We arrived at Johannesburg Timber and Box located in Bevan Road, Roodekop. I spoke to a gentleman by the name of Kevin, he and his staff were very friendly and helpful. He asked me what I needed the pallets for. I looked up at him with a woeful stare and answered “I want to make Pallet furniture.” As soon as I lowered my head he was on the phone asking the workers in the pallet yard to show me the bigger pallets for R45.00 each, he then quickly added there are smaller pallets 600mm x 800mm and he can give them to me for R10.00 each! I jumped up for DIY joy and managed a slight “air punch” with no one looking.
My friend and I laid them out, stacked them to form the L shape seated furniture I wanted! And just like that they worked – 3 stacked on top of one another for the seated part and one for the back rest. Total of four pallets for one seat! Jackpot! I will take 20 please!
Smaller pallets are easier to transport, manoeuvre, work with, shape and sort of dismantle – I have just saved you a 2.5 day delay on your own pallet furniture project.
Step 2: Dismantle-schmantle
Not the most fun bit of the pallet furniture project, but it has to be done. Luckily with the smaller 600mm x 800mm size pallets they work well as stacked seats, but I wanted a more streamline back rest without the stumpy “legs” of the pallet sticking out. So I counted how many I would need to dismantle the kegs off for the back rest and my doggie kennel/centre table. With all my brut, raw strength I picked up the phone and called my boyfriend for some help.
There is no way to get around this part, unless you leave the “stumpy legs” intact with the pallet. So there we were, my boyfriend and I, on a hot winter’s day, with safety gear on (and sunblock) holding strong garden forks, taking the stumpy “legs” off one pallet at a time. We also used (with great care) an angle grinder to shave off any unwanted rusty nails.
I suggest you call a friend to help you with this part of the project and be honest with them, tell them it is going to be a work out of strength and mental stability, but they will walk away with the fact that they helped you and will have a little back ache to remember the occasion.
Step 3: Painting optional
I did not like the brown dirty colour of the pallets and in my mind had envisioned a white, rustic wood look. So I used a product called “Mega Grip”. It is a white, water resistant paint. Even though the pallets have already been treated I thought extra water resistance would not hurt, seeing at it’s outdoor furniture under my gazebo. You can paint/stain the pallets any colour you desire.
Again another warm winter’s day and I took out the paint roller and tray and started to paint the pallets. At this point an hour and half in painting all the nooks and crannies of the pallets and remembering to cover both sides, I sat back and thought I can’t carry on, it’s too hard. This pallet project was starting to leave a very bad taste in my mouth!
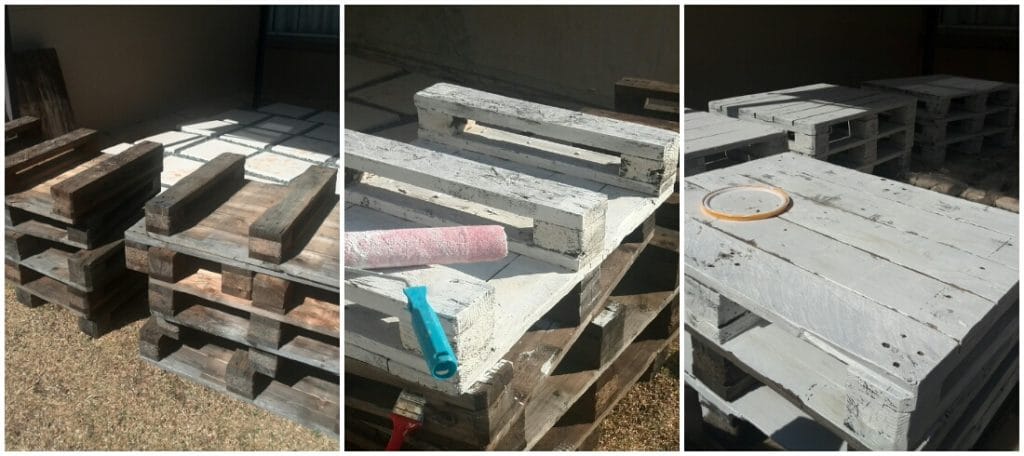
I had to take a day or so break, with my garden looking like an old factory yard. I came back, sat down on the grass and psyched myself up to complete it. I needed a system, as it looks like I had hardly painted. I got up and with determination I started forming the L shape seating I have had in my mind for 2 weeks now. When I saw the skeleton frame forming I got excited about this DIY project again and painted the pallets while they were in that shape so I could see my progress and find my motivation again. It worked. I painted faster and harder and saw it coming together.
I am sure during the middle stages of any DIY projects one just wants to give up. My advice is don’t do it. Take a break, gather your thoughts, think of a way to make it more streamlined and you will get over this hump and see the finished project soon enough.
Step 4: Joining your pallets together
This was fun, as a DIY enthusiast I love using power tools and using the right tools help you get the job done much quicker and with ease. I used a cordless hand drill, smooth shank cut-screws 6x120mm, a 5mm wood drill bit (for the pilot holes), mason flat flute nails 75×3.5mm and a hammer.
I turned the 3-stacked pallets on their sides, like how they would be stacked for seating but on the side so I could place exactly where I want the flat back rest pallet to be secured. I lined the wooden pallets up so that there were areas to secure as many screws in as possible; joining the back rest pallet piece to the 3 stacked seated pallets. Basically all the 3 pallets for the seating part will be joined to the back rest part.
I used a brick to place some weight on the back rest pallet before I started to drill pilot holes making sure that i missed the already embedded nails that were shaved off. Securing my 5mm wood use drill bit in to the chuck of my drill, wearing gloves and safety gear I drilled the pilot holes to later screw in the screws. Once I finished with the pilot holes, I changed the drill bits of the drill chuck to the screw bit that comes with the screw pack to drill those big screws into the wood.
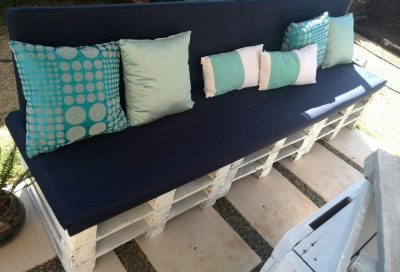
And once I had drilled in all the screws in to the pilot holes, my back rest pallet is secured to the 3 x stacked seating pallets and then slowly and carefully I moved the unit into place. Tested the back rest and sat on my first functional seated pallet, with complete excitement I continued to do the same to the remaining seats.
At the end of the day, packing my tools away, I then stood there with a big smile on my face seeing my undressed pallet furniture staring right back at me and I could not wait for the next day when I could take a trip to a fabric store to choose fabric and foam.
Step 5: Making your pallet comfortable and easy on the eye
I knew exactly what colour I wanted and what size foam I needed. Walking into the fabric store I had my measurement on hand and they saw a lady on a mission. They staff were helpful and helped me choose durable, water resistant fabric for R45 per meter, and the foam was cut to size there and then. If you want to cut your own foam, I saw the guys at the store do it with an electric bread knife – pretty neat tip!
I left the fabric store with foam, my fabric, some fabric glue and Velcro to cover my foam with the fabric. I opted for fabric glue and Velcro as I am not a seamstress… yet!
And wrapping my foam with the fabric like a Christmas present securing Velcro and fabric glue where I could. I left it over night to dry inside my house on my living room floor. The next day like a little kid on Christmas day I was up and took the foam covers to my pallet furniture and placed them perfectly and then I sat down, with a huge grin. I did it!
It was not easy, but was it worth it? Looking back as I sip my coffee while lounging on my outdoor DIY pallet furniture is yes, so worth it.
It was difficult at times; a lot of time and effort but that is the game of going DIY. This outdoor L shaped pallet seating cost me just over R1000.00 a fraction of what they would cost in store. But the satisfaction of looking at something you did yourself is priceless. I do indeed advise you if you have always wanted to try it give it a bash, take my tips and advice into account and your pallet journey will be a great one, if not better than mine.
As I always say if you can DIY, then why not!