DIY Rubbish Bin Cover
This rubbish bin cover is easy to assemble and a great way to hide and contain your rubbish during wind and storms. This is also a great way to hide and contain other outdoor eyesores, like AC units, well houses, and even pool toys. This plan fits a can size of 28″ wide, 24″ deep, and 44″ tall.

Cutting List
(2) Side Panel Front Pieces, 1 1/2″ x 3 1/2″ x 46 1/2″ one end mitered 7 degrees (Long points of cuts will be on opposite edges)
(2) Side Panel Back Pieces, 1 1/2″ x 3 1/2″ x 49 1/2″ one end mitered 7 degrees
(2) Side Panel Bottom Pieces, 1 1/2″ x 3 1/2″ x 21″
(2) Side Panel Top Pieces, 1 1/2″ x 3 1/2″ x 21 1/4″ ends mitered 7 degrees parallel
(3) Frame Pieces, 1 1/2″ x 3 1/2″ x 30″
(2) Door Frame Sides, 1 1/2″ x 3 1/2″ x 44″
(2) Door Frame Top and Bottom, 1 1/2″ x 3 1/2″ 22 1/2″
(7) Door Slats, 3/4″ x 3 1/2″ x 40″
(2) Side Slats Front, 3/4″ x 3 1/2″ x 42″
(2) Second Side Slats, 3/4″ x 3 1/2″ x 42 1/2″
(2) Third Side Slats, 3/4″ x 3 1/2″ x 43″
(2) Fourth Side Slats, 3/4″ x 3 1/2″ x 43 1/2″
(2) Fifth Side Slats, 3/4″ x 3 1/2″ x 44″
(2) Back Side Slats, 3/4″ x 3 1/2″ x 44 1/2″
(9) Roof Slats, 3/4″ x 3 1/2″ x 30″
Let’s Make It
Step 1
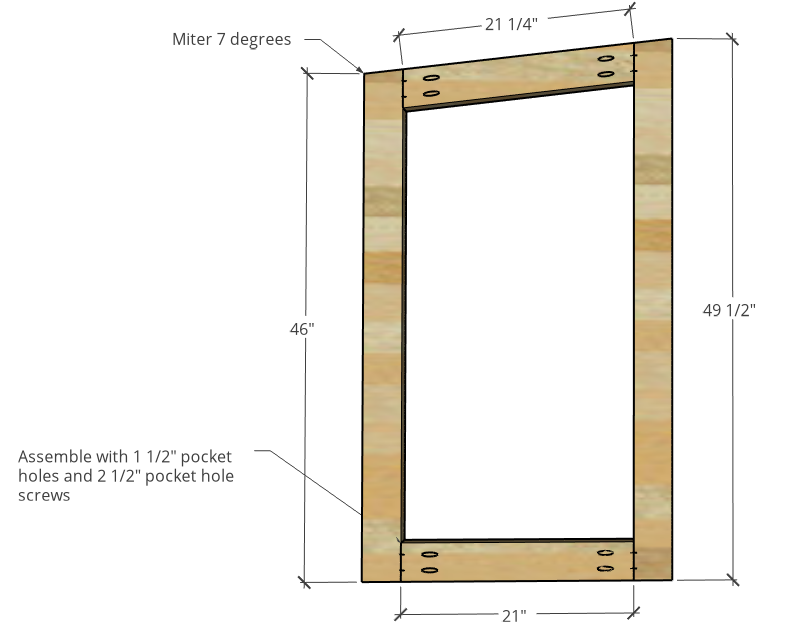
Cut and Assemble Side Frames
Cut 2×4 pieces as shown for making TWO side frames. Note that the top ends of the front and back are mitered 7 degrees and the top frame piece has ends mitered 7 degrees. This is to allow the roof to slant for drainage. Assemble like shown with 1 1/2″ pocket holes and 2 1/2″ exterior (Blue Kote) pocket hole screws. Place the pocket holes on opposite sides on each frame so that when they’re placed side by side, the pocket holes face the INSIDE.
Step 2
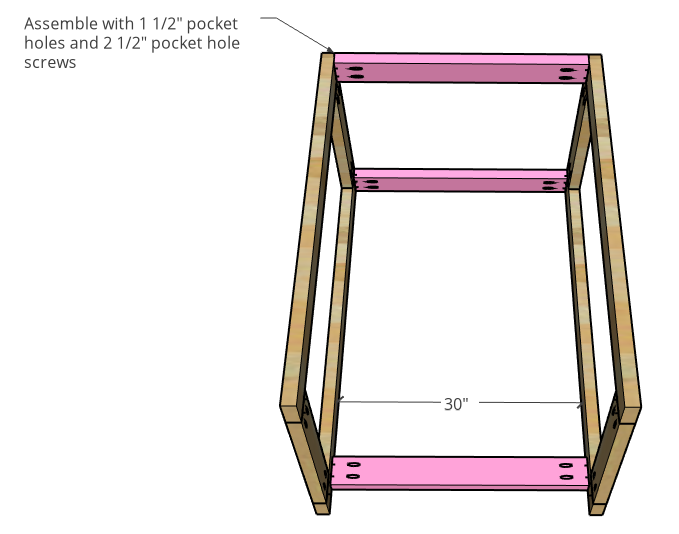
Assemble Rubbish Bin Cover Frame
Cut 3 pieces of 2×4 board to assemble the remainder of the frame. Drill 1 1/2″ pocket holes into the ends and assemble as shown using 2 1/2″ exterior pocket hole screws. Place one at the top front, one at the top back, and one towards the bottom at the back. I left mine about 3″ from the bottom just so that it wasn’t sitting directly on the ground to protect it from moisture.
Step 3
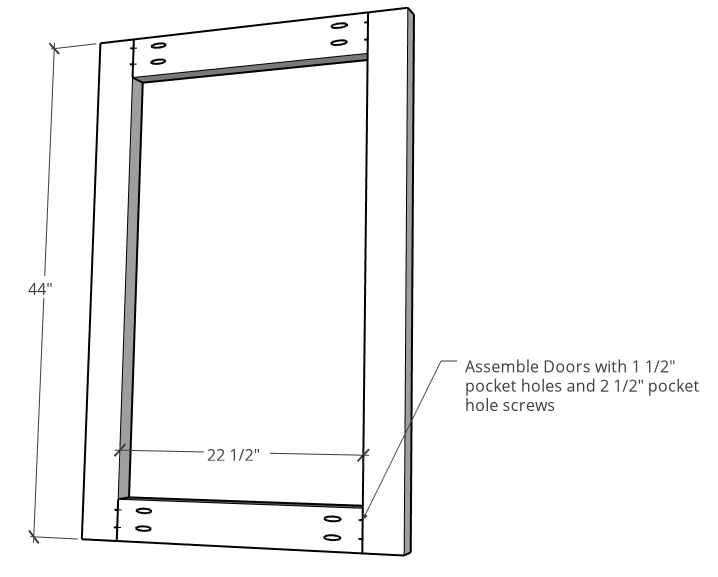
Assemble Door Frame
Cut 2x4s as shown to assemble the door frame. Use 1 1/2″ pocket holes and 2 1/2″ exterior pocket hole screws to assemble.
Step 4 (no image)
Paint (optional)
Because I was doing a two tone look and painted the frame black and stained the slats, I went ahead and painted both the door frame and the trash can cover frame black before adding the slats. This is optional, it just makes it easier to do it now vs. later. Also, if you want to stain your slats, it’s best to do it now before you install them in the next steps.
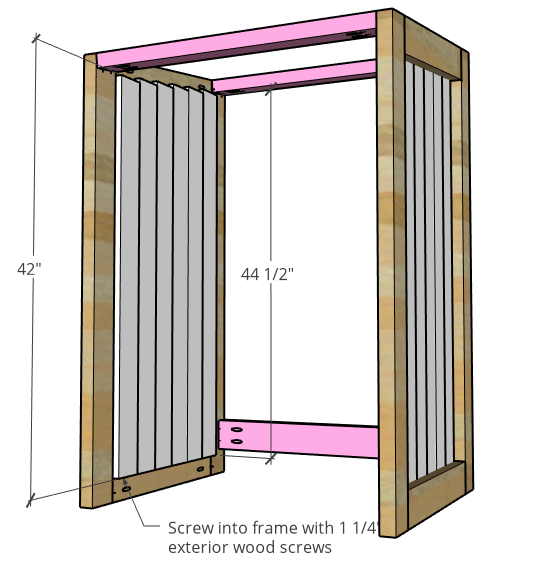
Step 5
Add Side Panel Slats
Add Door Slats
Install 1×4 side panel slats as shown using 1 1/4″ exterior wood screws. Because the sides are slanted, I started out at the front with 42″ long slats and added 1/2″ to each consecutive slat as I moved towards the back. I simply placed the slats with about 1/2″ overhang over the bottom frame piece and screwed these in place at the top and bottom.
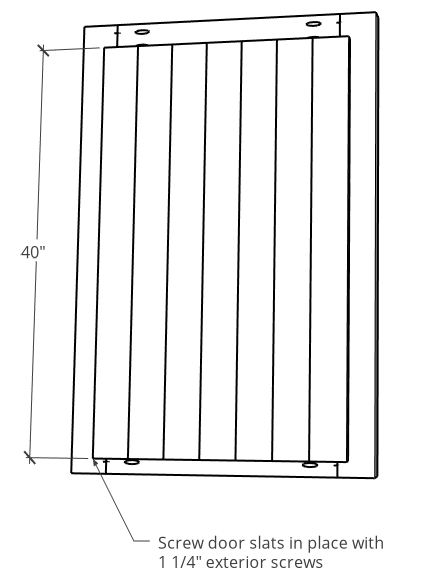
Step 6
Cut 1x4s for the door slats as shown. Centre the boards over the opening and screw in place at the top and bottom with 1 1/4″ exterior wood screws.
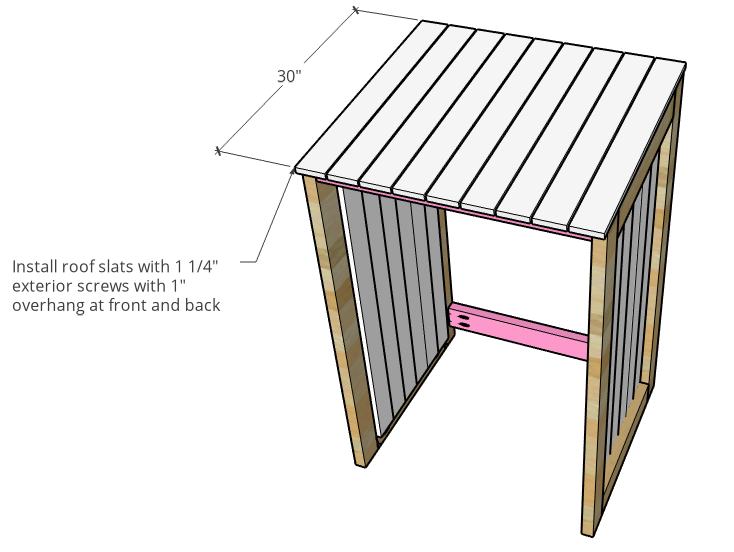
Step 7
Add Roof Slats
Cut and install 1×4 roof slats as shown with 1″ overhang at the front and back. Leave about 3/16″ – 1 1/4″ gap between each slat. Screw in place using 1 1/4″ exterior wood screws.
 Step 8
Attach Door
Install the door onto the frame leaving about 1/4″ space on all sides using some gate hinges or large hinges suitable for outdoor use. Then, install a small latch (as desired) to be able to latch the door shut when needed.
 NOTE!
NOTE!
It’s recommended to use cedar OR treated lumber for this rubbish bin cover as those last longer outdoors. You can use untreated lumber, but it will eventually rot as it’s not made for use out in the elements. Make sure to use a good exterior grade finish and screws suitable for use outdoors as well.